Harbor Private Registry: Image Vulnerability Scanning Demo

The popular open source Harbor registry has released a new version 1.2. In this version, it introduces a new feature called Vulnerability Scanning. It can scan through the images stored in Harbor and report any vulnerability found in images. The vulnerability has a few level of severity: normal, low, medium and high. The administrator of Harbor can set a threshold, e.g. High, so that any images with vulnerabilities equal to or above that level will be rejected from pulling. This ensure the images with vulnerability cannot be used in a production or other environment.

The scanning actually goes through all files of a container image and shows how many packages are found with problems and the level of security risk. This is quite straightforward for an administrator to understand the risk inside an image.

The scanning happens when an image has been pushed to a Harbor private registry. The scanning can also be scheduled at a specified time, e.g. at the mid night everyday, to reduce the resource consumption during the peak hours of a day.

Harbor leverages Clair project for this vulnerability scanning feature. It automatically checks for update from a few CVE sources. When an update in CVE database is found, it downloads the data and use it in the next scan.

Here is a demo of the vulnerability scanning feature.

If you are interested in this scanning feature, you can download the latest version of Harbor Registry and try it out.


The Inspiration Behind Open Source Project Harbor

About Project Harbor

Project Harbor is an enterprise-class registry server that stores and distributes Docker images. Harbor extends the open source Docker Distribution by adding the functionalities usually required by an enterprise, such as security, identity and replication.

The Inspiration Behind Project Harbor

When I attended container meetups and conferences in early 2014, I often heard people complaining about container image management challenges. They usually created various hacks or workarounds to solve their problems. When I saw pain points like these, I had a gut feeling there would be a great opportunity to create a solution addressing these challenges. Shortly after these discussions, we started a side project for managing container images. And that’s where Project Harbor began.

Why We Chose to Open Source Project Harbor

Originally, we dogfooded our project within the VMware China R&D Center. We used Harbor in a few internal projects and received positive feedback from our teams. In March 2016, we ultimately decided to open source Project Harbor on Github for larger adoption and more feedback.

How We Landed On the Name “Harbor”

We chose a name related to containers. Harbor is a place where containers are loaded on or unloaded from ships. Moreover, the word “Harbor” is simple and can be easily pronounced and remembered, making it a strong choice for project promotion.

The People Behind Project Harbor

At the beginning, only about six people were involved with the project—mostly engineers and interns in our Advanced Technology Center (ATC) team at VMware China R&D. Gradually, community users started to join forces with us, collaborating to help improve the project. Currently, there are approximately 50 contributors, and about two-thirds are outside of VMware.

Project Harbor Momentum

Since Project Harbor was open sourced last year, it gained significant traction in terms of adoption and new contributors. I think Project Harbor has seen substantial momentum due to many factors. First, it hit the pain points and solved many container user problems. Second, Harbor is open source and has an open community mindset; our actions reflect constant user feedback and suggestions to ensure improvement. We also work with partners in the ecosystem to build products or create solutions using Harbor. Third, we promoted Harbor through social media channels, like WeChat, blogs and Twitter.

I look forward to sharing more about Project Harbor, answering any community questions and sharing my thoughts on other open source projects in the future.

This blog was originally posted at

https://blogs.vmware.com/opensource/2017/07/19/the-inspiration-behind-open-source-project-harbor/

Project Harbor Reached Milestone of 2000 Stars on Github

About a year ago, I gave the first star to an open source project we created. In less than 13 months, the project has reached an exciting milestone of 2000 stars!  This project is called Harbor, an enterprise class registry server.

People from different countries starred Project Harbor on Github

Back in early 2014, when I attended Docker meetups and container conferences, I often heard people complaining about the challenges to manage container images. They usually created all kinds of hacks or workarounds to solve their own problems. When I saw pain points like these, my gut feeling told me that it must be a great opportunity to do something to it.

We then started to work on a side project to help people manage image effectively. This project became the prototype of Harbor. It was used by a few project teams and turned out to be quite helpful. In March 2016, we decided to open source it on Github for larger adoption. Since then, Project Harbor has taken off and been gaining more and more traction. We listened to feedback from the community and kept improving it. Community developers were enthusiastic and they contributed code, tools, documentation and even translation to multiple languages to the project. Two third of the contributors was actually from outside of VMware.

Gradually, Harbor becomes one of the most popular open source registries and has been widely used by people in the container space. VMware has also integrated Harbor into two products: vSphere Integrated Containers and Photon Platform. Many users run Harbor in their production, such as one of the largest internet companies, JD.com in China. Other companies also forked Harbor and used in their own products. Below are some statistics of Project Harbor.

Project Harbor Statistics

The current version of Harbor provides some important features to enterprise users, such as RBAC (Role Based Access Control), LDAP/AD authentication, image remote replication, management portal. In the coming new release, Harbor will be adding new features like Notary and a new admin UI.

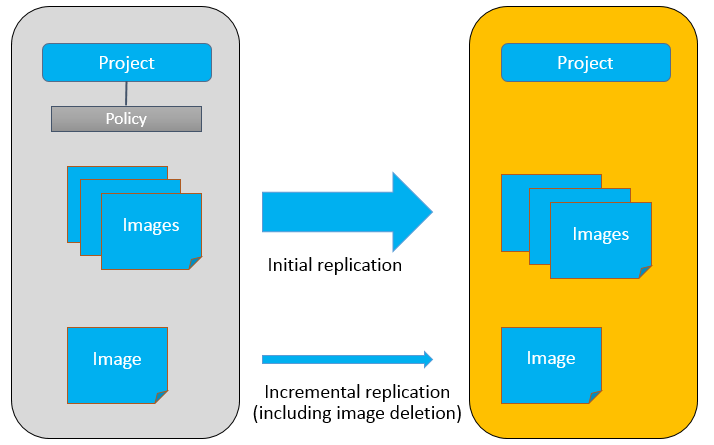
One of my favorite features of Harbor: Remote replication (synchronization) of images

While we are celebrating the milestone of Harbor, it certainly serves as a new starting point to us. Thanks everyone who contributed to Harbor’s success. Your continuous support definitely motivates us to make Harbor the best home for your container images!

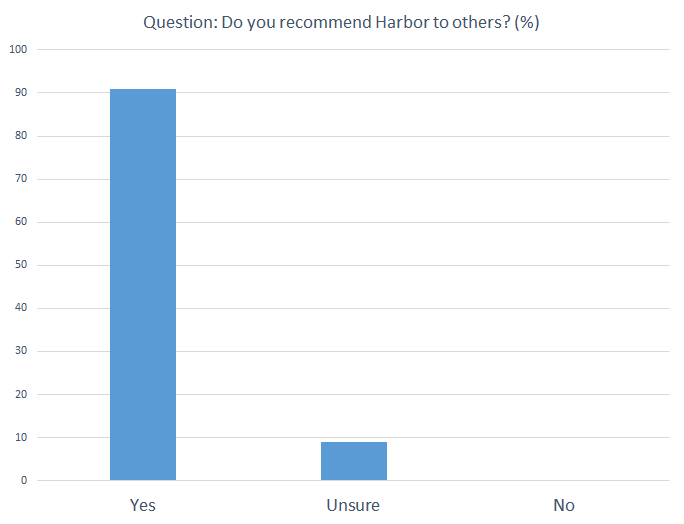
Survey based on user community, 53 responses

Related Topics:

Architecture of Harbor: An Open Source Enterprise-class Registry Server
Private Docker Registry Harbor Achieves HA based on Virtual SAN
Working with Harbor Registry REST API via Swagger

Private Docker Registry Harbor Achieves HA based on Virtual SAN

Recently, VMware released the Docker Volume Driver for vSphere 1.0 beta, which enabled a Docker host to create volumes directly on a vSphere datastore (Virtual SAN, VMFS, NFS, etc). The volumes can be directly mounted into Docker containers. The Docker volume solves the problem of storing persistent data of Docker containers. The Docker Volume of vSphere not only simplifies storage configuration, the volumes can also be associated with the Storage Policy Based Management (SPBM) of vSphere. For example, an administrator can set Fault To Tolerant (FTT) or Stripe Width (SW) of the data volume. Volumes with SPBM can achieve a higher data protection level and better performance. The docker volume driver of vSphere is an open-source project. It is downloadable at https://github.com/vmware/docker-volume-vsphere .

This blog walks through the steps of creating data volumes in VMware Virtual SAN (VSAN). As an example of a containerized application, the open source Harbor Registry is used to describe the usage of data volumes provisioned by VSAN, through which Harbor Registry achieves a higher data protection level and high availability (HA).

A little more background about Harbor Registry: it is another open-source project by VMware. A registry is one of the necessary components of a container’s build-ship-run lifecycle. Harbor helps users set up an enterprise private Docker registry service rapidly. Furthermore, it also provides enhanced features usually required by enterprises such as graphical user interface (GUI), role based access control, AD/LDAP integration and image replication. Harbor’s Github repo: https://github.com/vmware/harbor .

vsanharborha1The architecture of the system is illustrated in the above figure. 3 ESXi hosts form a VSAN cluster. A Harbor registry VM is running on one of the hosts. Besides, there are three external Docker volumes created in the VSAN cluster, used for storing persistent data in Harbor. This cluster provides consolidated storage by local disks of each host. It can tolerate a failure of one physical host and still preserve data integrity and accessibility.

The configuration process is discussed as follows.
1.    First, set up a Virtual SAN cluster with 3 ESXi hosts. A photon OS VM ( https://vmware.github.io/photon/ ) is installed on one of the ESXi server as a Docker host. Of course, other Linux distributions like Ubuntu can be used as well, as long as it can run Docker Engine and Docker Compose.

t12.    On the release page of Docker Volume Driver for vSphere project (https://github.com/vmware/docker-volume-vsphere/releases), download the plugin for ESXi host and for VMs respectively. For example, for 1.0 beta, the file names are:

vmware-esx-vmdkops-1.0.beta.zip
docker-volume-vsphere-1.0.beta-1.x86_64.rpm

3.    On each of the ESXi hosts, use the following commands to install the plugin (SSH of ESXi host must be enabled). After installation, no reboot is required.

# esxcli software vib install -d "/vmware-esx-vmdkops-1.0.beta.zip" \
--no-sig-check –f
Installation Result
Message: Operation finished successfully.
Reboot Required: false
VIBs Installed: VMWare_bootbank_esx-vmdkops-service_1.0.0-0.0.1
VIBs Removed:
VIBs Skipped:

4.    On the Photon VM, install the RPM package. For other Debian based OS, install the corresponding deb package.

# rpm -ivh docker-volume-vsphere-1.0.beta-1.x86_64.rpm
Preparing...                              ##################### [100%]
Updating / installing...
1:docker-volume-vsphere-0:1.0.beta-############################ [100%]
File: '/proc/1/exe' -> '/usr/lib/systemd/systemd'
Created symlink from /etc/systemd/system/multi-user.target.wants/\
docker-volume-vsphere.service to /usr/lib/systemd/system/
docker-volume-vsphere.service.

5.    After the ESXi plugin is installed, a management script is generated at /usr/lib/vmware/vmdkops/bin/vmdkops_admin.py. This script helps administrators manage the data volumes. For example, an administrator can create different storage policies. In Virtual SAN, the default storage policy has a Stripe Width setting of 1 (SW=1). We will create a new policy with SW=2 as an example.
To do this, just SSH into any of the ESXi hosts and run this command:

# /usr/lib/vmware/vmdkops/bin/vmdkops_admin.py policy \
create --name SW=2 --content '(("stripeWidth" i2))'

The parameter ‘SW=2’ is the name of the policy. The key point here is to set the content of the policy and it is ‘((“stripeWidth” i2))’ in this example. Other settings are the same as the Virtual SAN policy parameters. The possible parameters and their description are as follows:spbm6.    Now Docker volumes can be created on the Docker host (the Photon OS VM). As an example, we first create two volumes with default storage policy and then create another volume with the newly created ‘SW=2’ policy.

# docker volume create --driver=vmdk --name=vsanvol1 -o size=50gb
vsanvol1
# docker volume create --driver=vmdk --name=vsanvol2 -o size=20gb
vsanvol2
# docker volume create --driver=vmdk --name=vsanvol3 -o size=20gb \
-o vsan-policy-name=SW=2
vsanvol3

By specifying the ‘–driver=vmdk’ parameter, the external volume is created in the vSphere datastore. The volume is created in the same datastore where the Photon OS VM resides. In this example the Photon OS VM is stored in Virtual SAN, so are the Docker volumes. These volumes are stored in the form of VMDK. What is noteworthy here is that the volumes are not mounted to any VM by now. So if we navigate to the vSphere Web Client, we cannot find any information about these newly created volumes from the VM’s page.t2However, we can indeed find them in the dockvols directory in the Virtual SAN datastore.t3In subsequent sections, we are able to find the VMDKs through the VM’s page when the volumes are mounted to running containers.

7.    On the Photon OS VM, download the Harbor Registry source code. Before installing Harbor, we need to modify the harbor/Deploy/docker-compose.yml configuration file in order to use the newly created external volumes. We can then install Harbor by following the official Harbor installation guide.

Open the docker-compose.yml file. Find the ‘registry’ section, modify these lines:

volumes:
  - /data/registry:/storage
  - ./config/registry/:/etc/registry/

to

volumes:
- vsanvol1:/storage
- ./config/registry/:/etc/registry/

vsanvol1 is the external volume we just created.
Next, look for the ‘mysql’ section and modify these lines:

volumes:
  - /data/database:/var/lib/mysql

to

volumes:
  - vsanvol2:/var/lib/mysql

Similarly, vsanvol2 is another volume we just created.
Next, look for the ‘jobservice’ section and modify these lines:

volumes:
  - /data/job_logs:/var/log/jobs
  - ./config/jobservice/app.conf:/etc/jobservice/app.conf

to

volumes:
  - vsanvol3:/var/log/jobs
  - ./config/jobservice/app.conf:/etc/jobservice/app.conf

Similarly, vsanvol3 is another volume we just created.
In the end of the file, add the following lines:

volumes:
  vsanvol1:
    external: true
  vsanvol2:
    external: true
  vsanvol3:
    external: true

These lines indicate that these volumes have already been created and do not need to be created by Docker again. Keep other configurations unchanged in the docker-compose.yml. Then install Harbor as the official guide and bring up Harbor registry service.

8.    After Harbor is running, we can check the vSphere Web Client and confirm that these 3 external volumes are indeed mounted to the Photon OS VM. They are mounted as ‘Hard Disk 2’,‘Hard Disk 3’ and ‘Hard Disk 4’ in the VM respectively. In this beta version, there seems some bugs about displaying storage policy. For example, the storage policies for these VMDKs are displayed as ‘None’ while we can see that ‘Hard Disk 3’ is created as ‘SW=2’ policy and the other two VMDKs are created with the default storage policy. The below screenshot shows a storage policy of ‘Hard Disk 4’:t5There may be a problem where Virtual SAN cannot identify the storage policy created by ‘” Docker Volume Driver for vSphere’ correctly. This problem should be solved in newer version.

9.    Let’s upload two images to test if there is any data loss when a host fails.t610.    Enable vSphere HA on this Virtual SAN cluster, with default HA settings. Then we identify that the Photon OS VM is on the ESXi host with IP address 10.162.102.130.t711.    Power off the physical host with IP address 10.162.102.130. Wait for a while after HA restarts the VM and check the state of Photon OS VM.t8The VM has been restarted on another heathy host. The original external volumes are mounted to the restarted VM. Because a host of the VSAN cluster is powered off, for each VMDK there will be a component shown as ‘absent’. However, with the default storage policy Virtual SAN can tolerate a host’s failure, so the access to the data is still successful.
12.    After Photon VM is restarted, check the status of Harbor. All the services and containers are running as normal.t1013.    Check Harbor UI, the 2 images we uploaded before are still intact. This indicates that there is no data loss.t11When vSphere HA restarted the Harbor VM on another healthy host, all the containers of Harbor are also restarted. They are connected to the original same volumes as in the figure:vsanharborha2This blog introduces an example of achieving Harbor registry HA by leveraging Virtual SAN and vSphere HA. Since Harbor is a multi-container application, this approach can also be applied to other container-based applications.

Related posts:

Architecture of Harbor: An Open Source Enterprise-class Registry Server

Working with Harbor Registry REST API via Swagger

Working with Harbor Registry REST API via Swagger

Swagger is the most popular RESTful API tool, it contains an entire set of codes, editors, code generators etc, and can be used in API descriptions, definitions, generation and visualization etc. For details about Swagger, see http://www.swagger.io, where you can download its source code and integrate it with the project.

Harbor is an enterprise-class private registry server initiated by VMware(http://github.com/vmware/harbor). Harbor also offers RESTful API which provides easy integration with other container management platforms. This article describes how to use Swagger tools embedded in Harbor to test RESTful APIs.

First, let’s take a look at how Swagger creates descriptions and definitions for RESTful API. Swagger provides an online WYSIWYG editor at http://editor.swagger.io/, users can enter Swagger-compatible YAML or JSON input on the left pane of the editor, and the result of the input will be shown on the right pane. If there are any input errors, there are alerts with amendment recommendations for the user, it’s very convenient! Refer to http://swagger.io/specification/ for instructions on writing definition files that are compatible with Swagger. This editor also supports the download of completed YAML to the local system, or conversion to JSON format. It can even help us auto-generate a Mockup Server or client.

Swagger Embedded in Harbor

Core functions of Harbor are implemented through RESTful API. A set of API rules that can be visualized was documented in Swagger during the development process and is provided for users as part of the project.

The Harbor Project utilizes two methods to let users present or control RESTFul API with Swagger.

The first is the “static” method, which only uses Swagger as the tool for presentations and reviews. Users only have to locate the swagger.yaml file from the directory docs/ of Project Harbor , and through the editor, open, select all, copy, and paste into the code pane on the left of Swagger online editor. The right pane will display a visualization of the Harbor RESTful API document page for review and reference.
article3_image1The second method is the “dynamic” method, which involves deploying Swagger UI and Harbor REST services in the same Server. Users can use Swagger to control and test Harbor RESTful APIs. This method may change data in the database, so it is not suggested to be used in production systems. Deployment procedures are illustrated in the figure below:article3_image2Under the directory docs/ of Harbor Project source codes, there is a script file named prepare-swagger.sh, which can help users carry out “dynamic” deployment. The following provides instructions on related steps. For detailed information, please refer to the file docs/configure_swagger.md:

(1) Change the SERVER_IP value in the script file, set it to the IP address of the host system of currently deployed Harbor system, save changes and execute the script. The script will download the Swagger software package accordingly and decompress it to the directory of static resources of Harbor Project vendors; copy the swagger.yaml files under docs/ to the Harbor Project static resource directory resources/yaml; change/replace URL contents according to the SERVER_IP provided by the user.

(2) Switch to the Deploy directory, change the file named “docker-compose.yml”, mount the newly-added Swagger static resource directory onto Harbor UI Docker container through Volumes, letting SwaggerUI deploy together with Harbor UI after starting up, to provide external access.

(3) Use the docker-compose command to re-create Project Harbor, clear all content left on the server, restart the newly created Project Harbor image.

The figure below shows a screenshot of a deployed Swagger UI page.
article3_image3article3_image4
RESTful API Authentication

When triggering Harbor RESTful API using Swagger UI, please be aware of “login status” issues, because some of API requires session information. There are two ways to configure a session.

Method 1: Open the UI with a browser (Note: Make sure that the IP address of the URL in the Harbor UI is the same as the value provided for SERVER_IP when deploying Swagger UI), complete the registration (if using for the first time) and login; then open a new (tab) in the same browser, enter the Swagger UI address below, this will ensure that HarborRESTful API is running when the user is logged in.

http://static/vendors/swagger/index.html

Method 2: Harbor RESTful API supports Basic Authentication mode. However, Swagger currently does not allow the input of usernames and passwords on its interface, so access becomes inconvenient. Those who are interested can follow this link https://github.com/swagger-api/swagger-ui and try to make Swagger accessible in Basic Authentication mode. Of course, the user can also use the below command to access API. In this way, the user does not have to log in to Harbor’s UI in order to test the API.

curl -u <username: password>

Related article:

Harbor Architecture Overview

Architecture of Harbor: An Open Source Enterprise-class Registry Server

About Project Harbor

VMware has initiated an enterprise-class Registry called Project Harbor, which helps users rapidly build a private enterprise-class registry service. It extends the open source Docker Distibution by adding the functionality usually required by an enterprise, such as management UI, Role Based Access Control(RBAC), AD/LDAP integration, image replication and auditing. The project has received over 1100 stars and been forked over 290 times since it was released 6 months ago. This article introduces the main modules of the Project Harbor and describes the operational principles behind Harbor.

Architecture

article1_image2

As depicted in the above diagram, Harbor comprises 6 components:

Proxy: Components of Harbor, such as registry, UI and token services, are all behind a reversed proxy. The proxy forwards requests from browsers and Docker clients to various backend services.

Registry: Responsible for storing Docker images and processing Docker push/pull commands. As Harbor needs to enforce access control to images, the Registry will direct clients to a token service to obtain a valid token for each pull or push request.

Core services: Harbor’s core functions, which mainly provides the following services:

  • UI: a graphical user interface to help users manage images on the Registry
  • Webhook: Webhook is a mechanism configured in the Registry so that image status changes in the Registry can be populated to the Webhook endpoint of Harbor. Harbor uses webhook to update logs, initiate replications, and some other functions.
  • Token service: Responsible for issuing a token for every docker push/pull command according to a user’s role of a project. If there is no token in a request sent from a Docker client, the Registry will redirect the request to the token service.

Database: Database stores the meta data of projects, users, roles, replication policies and images.

Job services: used for image replication, local images can be replicated(synchronized) to other Harbor instances.

Log collector: Responsible for collecting logs of other modules in a single place.

Implementation

Each component of Harbor is wrapped as a Docker container. Naturally, Harbor is deployed by Docker Compose.

In the source code (https://github.com/vmware/harbor), the Docker Compose template used to deploy Harbor is located at /Deployer/docker-compse.yml. Opening this template file reveals the 6 container components making up Harbor:

proxy: Reverse-proxy formed by the Nginx Server.

registry: Container instance created from the official image of Docker distribution.

ui: Core services within the architecture. This container is the main part of Project Harbor.

mysql: Database container created from the official MySql image.

job services: Replicating images to a remote registry via state machines. Image deletion can also be synchronized to a remote Harbor instance.

log: Container that runs rsyslogd, used for collecting logs from other containers through the log-driver mode.

These containers are linked via DNS service discovery in Docker. By this means, each container can be accessed by their names. For the end user, only the service port of the proxy (Nginx) needs to be revealed.

The following two examples of Docker command illustrate the interaction between Harbor’s components.

docker login

Suppose Harbor is deployed on a host with IP 192.168.1.10. A user runs the docker command to send a login request to Harbor:

$ docker login 192.168.1.10

After the user enters the required credentials, the Docker client sends an HTTP GET request to the address “192.168.1.10/v2/”. The different containers of Harbor will process it according to the following steps:

docker login(a) First, this request is received by the proxy container listening on port 80. Nginx in the container forwards the request to the Registry container at the backend.

(b) The Registry container has been configured for token-based authentication, so it returns an error code 401, notifying the Docker client to obtain a valid token from a specified URL. In Harbor, this URL points to the token service of Core Services;

(c) When the Docker client receives this error code, it sends a request to the token service URL, embedding username and password in the request header according to basic authentication of HTTP specification;

(d) After this request is sent to the proxy container via port 80, Nginx again forwards the request to the UI container according to pre-configured rules. The token service within the UI container receives the request, it decodes the request and obtains the username and password;

(e) After getting the username and password, the token service checks the database and authenticates the user by the data in the MySql database. When the token service is configured for LDAP/AD authentication, it authenticates against the external LDAP/AD server. After a successful authentication, the token service returns a HTTP code that indicates the success. The HTTP response body contains a token generated by a private key.

At this point, one docker login process has been completed. The Docker client saves the encoded username/password from step (c) locally in a hidden file.

docker Push

article1_image4(We have omitted proxy forwarding steps. The figure above illustrates communication between different components during the docker push process)

After the user logs in successfully, a Docker Image is sent to Harbor via a Docker Push command:

# docker push 192.168.1.10/library/hello-world

(a) Firstly, the docker client repeats the process similar to login by sending the request to the registry, and then gets back the URL of the token service;

(b) Subsequently, when contacting the token service, the Docker client provides additional information to apply for a token of the push operation on the image (library/hello-world);

(c) After receiving the request forwarded by Nginx, the token service queries the database to look up the user’s role and permissions to push the image. If the user has the proper permission, it encodes the information of the push operation and signs it with a private key and generates a token to the Docker client;

(d) After the Docker client gets the token, it sends a push request to the registry with a header containing the token. Once the Registry receives the request, it decodes the token with the public key and validates its content. The public key corresponds to the private key of the token service. If the registry finds the token valid for pushing the image, the image transferring process begins.

For more information about enterprise registry Harbor, take a look at Github: https://github.com/vmware/harbor