In last post, we introduced the mechanism of running Fabric on Kubernetes. This post continues with the details.
Download automation scripts
Let’s assume there is an instance of Kubernetes ready for running Fabric. There are a few scripts we use for the following steps. Download them here:
https://github.com/hainingzhang/articles/tree/master/fabric_on_kubernetes/Fabric-on-K8S/setupCluster
The downloaded scripts in Fabric-on-k8s/ folder are as follows:
Fabric-on-k8s
 |--README.md
 |--setupCluster
 |--generateALL.sh             // for generating the K8S deployment file
 |--transform                  // run kubectl relative commands
 |--templates                  // store templates
 |--cluster-config.yaml        // config Fabric cluster
 |--configtx.yaml              // config channel
Configuration files of Fabric
We need to edit two configuration files in the Fabric-on-k8s/ folder to define the Fabric cluster to be deployed:
A. cluster-config.yaml
The cryptogen tool generates certificates for Fabric members based on cluster-config.yaml. An example is as follows:
OrdererOrgs: - Name: Orderer Domain: orgorderer1 Template: Count: 1 PeerOrgs: - Name: Org1 Domain: org1 Template: Count: 2 - Name: Org2 Domain: org2 Template: Count: 2
Two keywords OrdererOrgs and PeerOrgs specify the type of organization:
1) OrdererOrgs defines an organization with the name Orderer and the domain name orgorderer1. The value of Count under Template is 1. It means only one orderer is under the organization. Its id is orderer0.
2) PeerOrgs defines two organizations: Org1 and Org2. The corresponding domain names are org1 and org2, respectively. As specified by the value of Count, each organization has two peers, namely peer0 and peer1. Peer0 of org1 and peer0 of org2 have the same ID, but they could be distinguished easily by domain name, e.g. peer0.org1 and peer0.org2.
Note: Since the namespace of Kubernetes does not support ‘.’ and uppercase letters, the domain names of each organization should follow the same rule.
For more information on how to customize cluster-config.yaml, please refer to the source code of cryptogen (fabric/common/tools/cryptogen/main.go) .
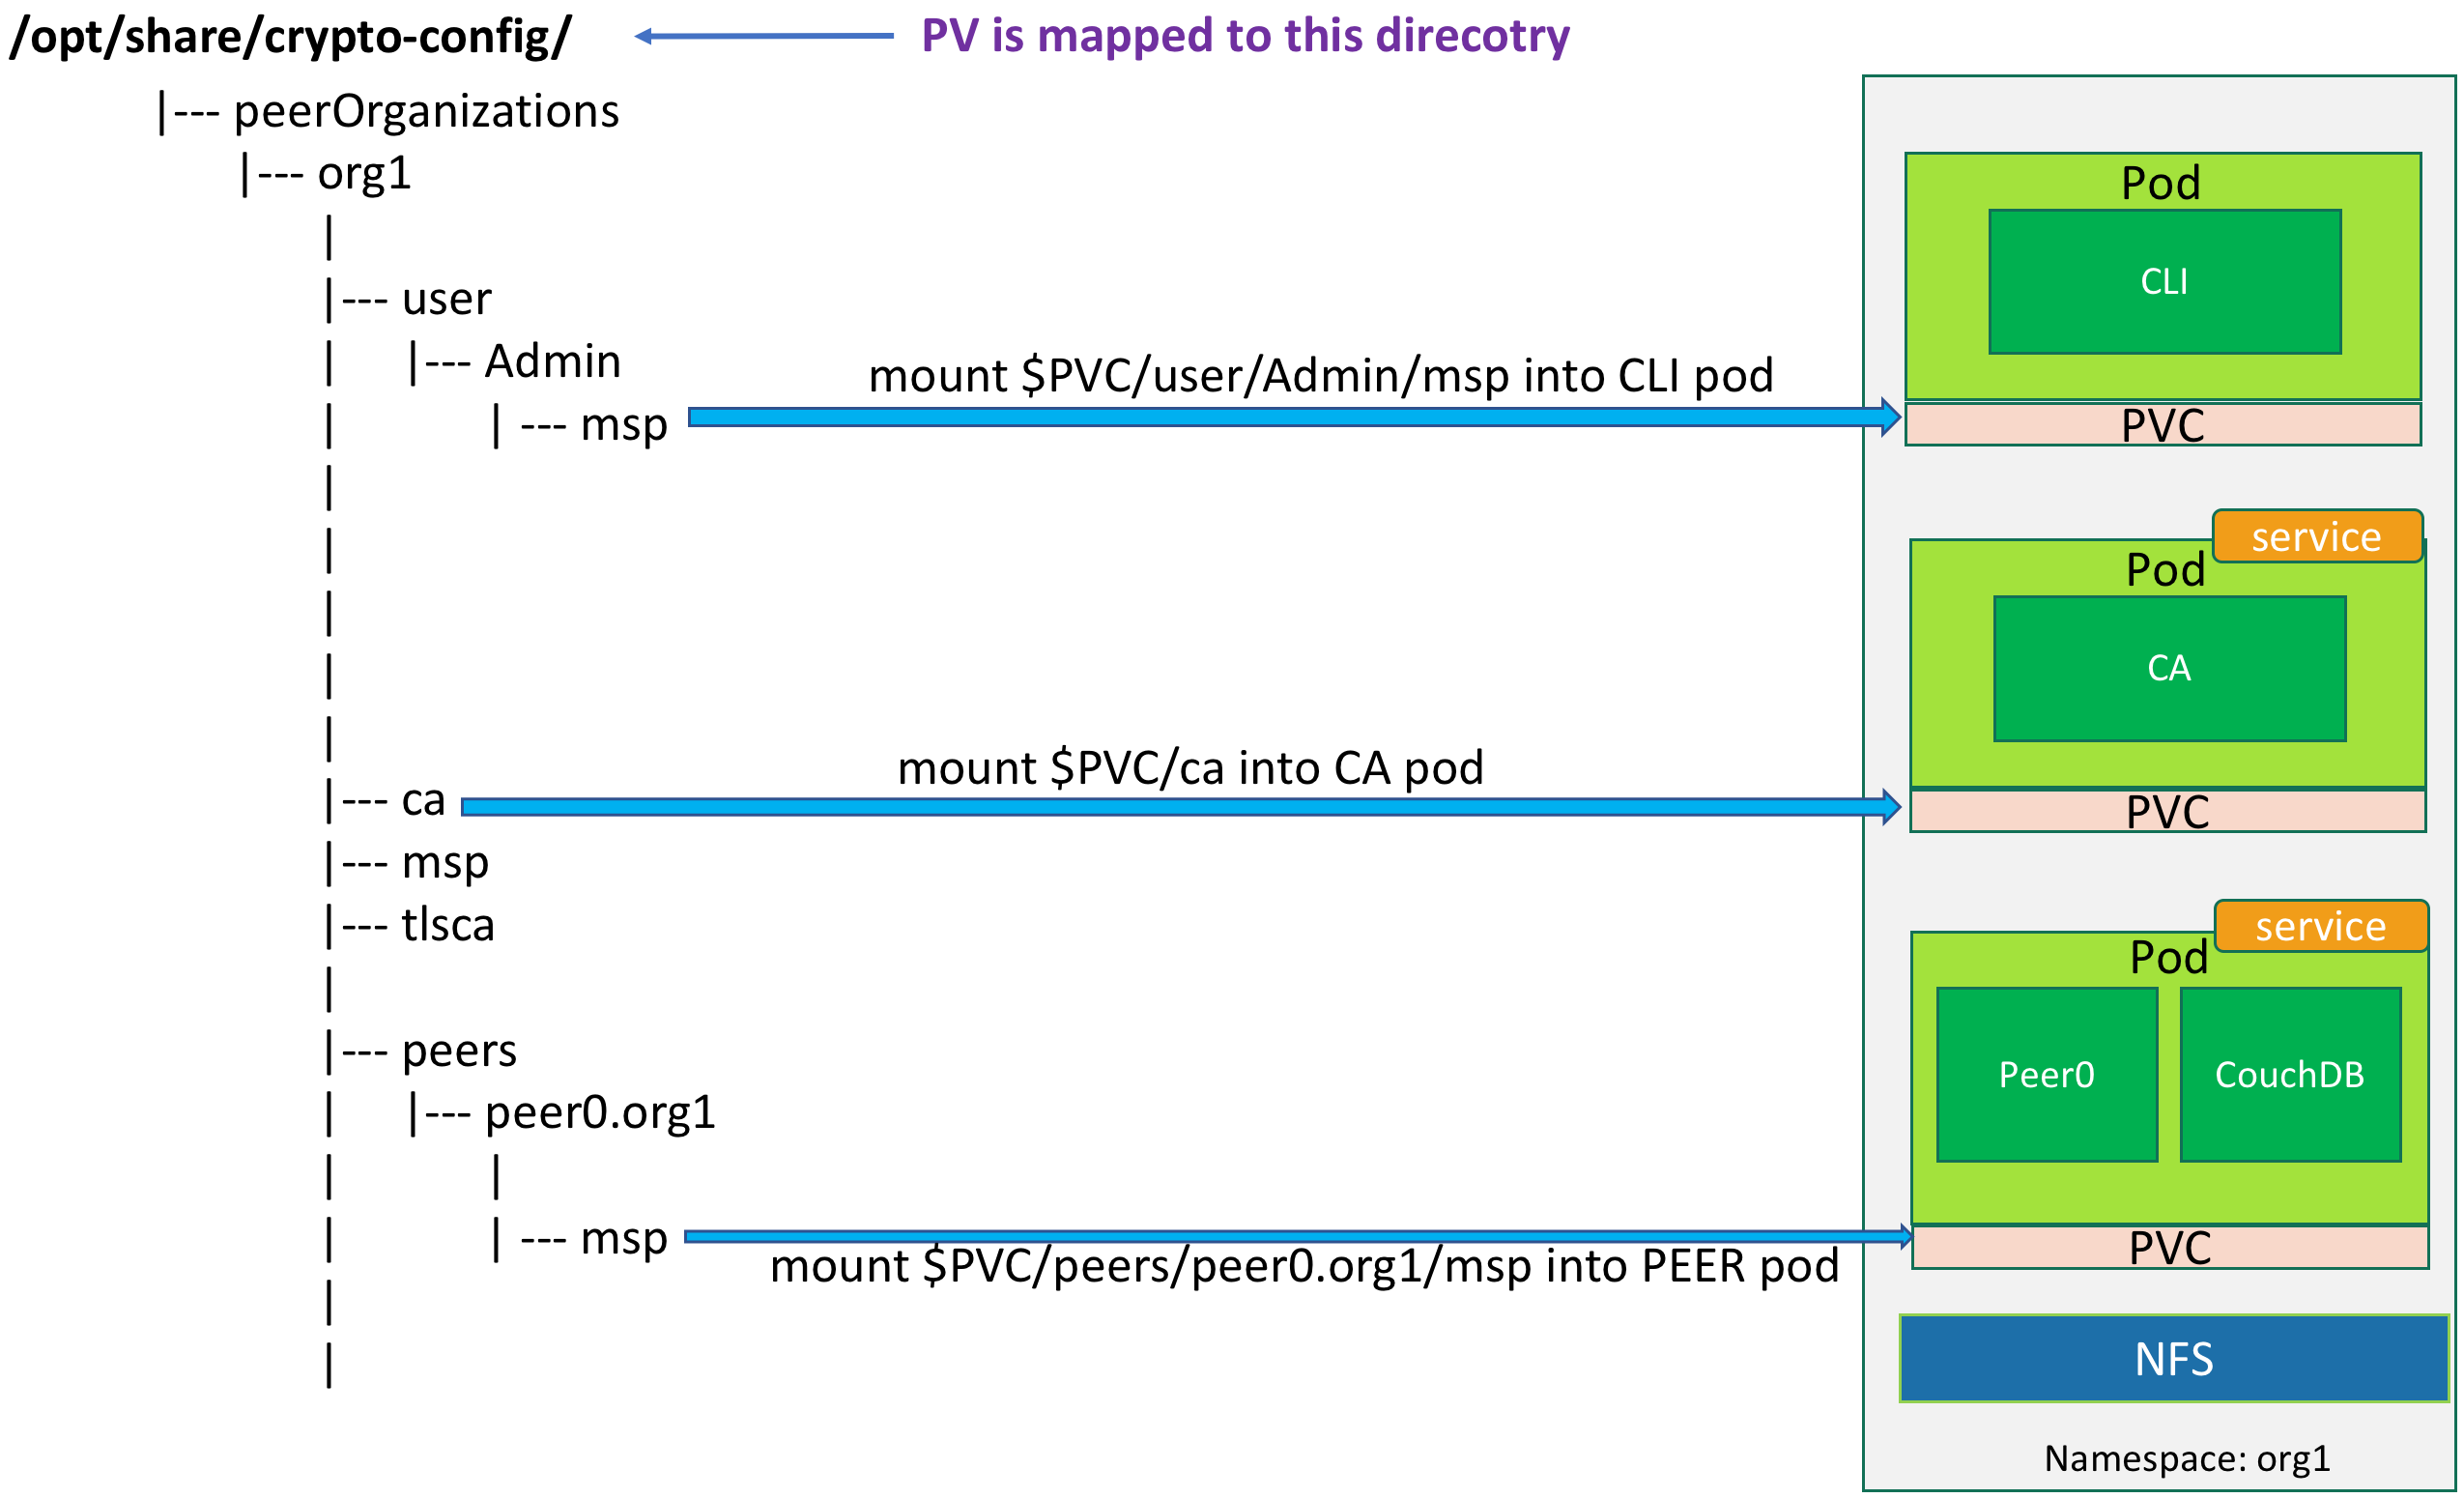
From the file cluster-config.yaml, cryptogen will generate crypto-config/ directory as follows:
crypto-config
|--- ordererOrganizations
|    |--- orgorderer1
|           |--- msp
|           |--- ca
|           |--- tlsca
|           |--- users
|           |--- orderers
|           |--- orderer0.orgorderer1
|                 |--- msp
|                 |--- tls
|
|--- peerOrganizations
      |--- org1
      |     |--- msp
      |     |--- ca
      |     |--- tlsca
      |     |--- users
      |     |--- peers
      |           |--- peer0.org1
      |           |     |--- msp
      |           |     |--- tls
      |           |--- peer1.org1
      |                 |--- msp
      |                 |--- tls
      |--- org2
            |--- msp
            |--- ca
            |--- tlsca
            |--- users
            |--- peers
                   |--- peer0.org2
                   |     |--- msp
                   |     |--- tls
                   |--- peer1.org2
                         |--- msp
                         |--- tls
B. configtx.yaml
The tool configtxgen will generate genesis block according to configtx.yaml. The genesis block is used to boot up orderer and restrict permission of channel creation. We need to modify configtx.yaml to generate the appropriate genesis block according to the definition of organizations in cluster-config.yaml.
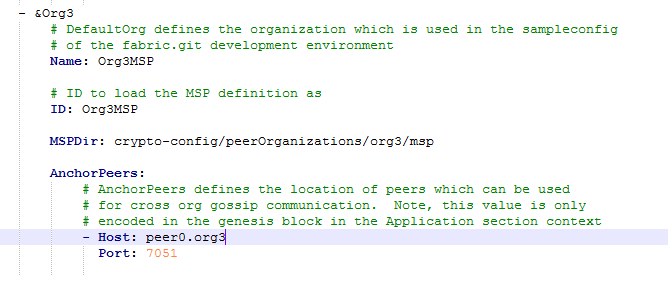
For example, if we add an Org3 to cluster-config.yaml and prepare to create a channel that contains Org1, Org2, Org3, we should modify configtx.yaml by the following two steps:
- Add Org3 to yaml:

- Add Org3 to Organizations section:
Template files of Kubernetes
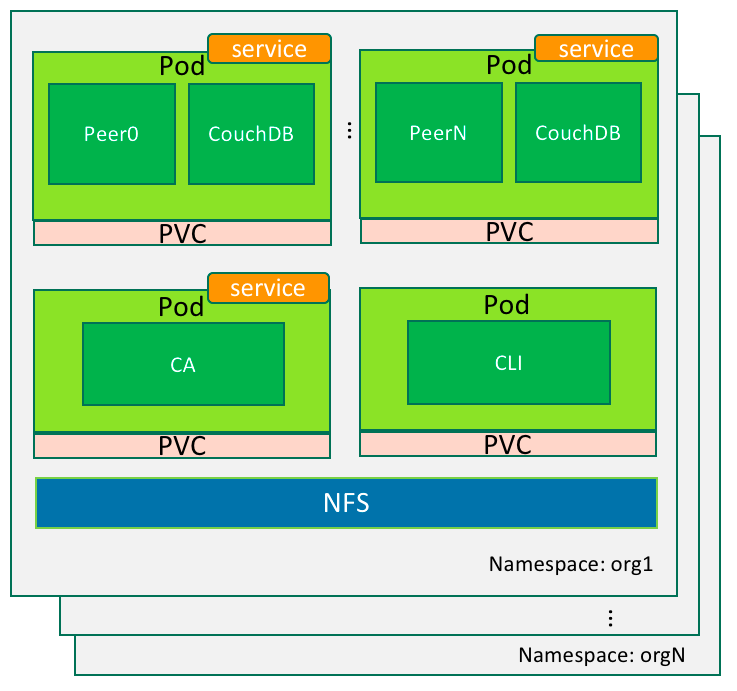
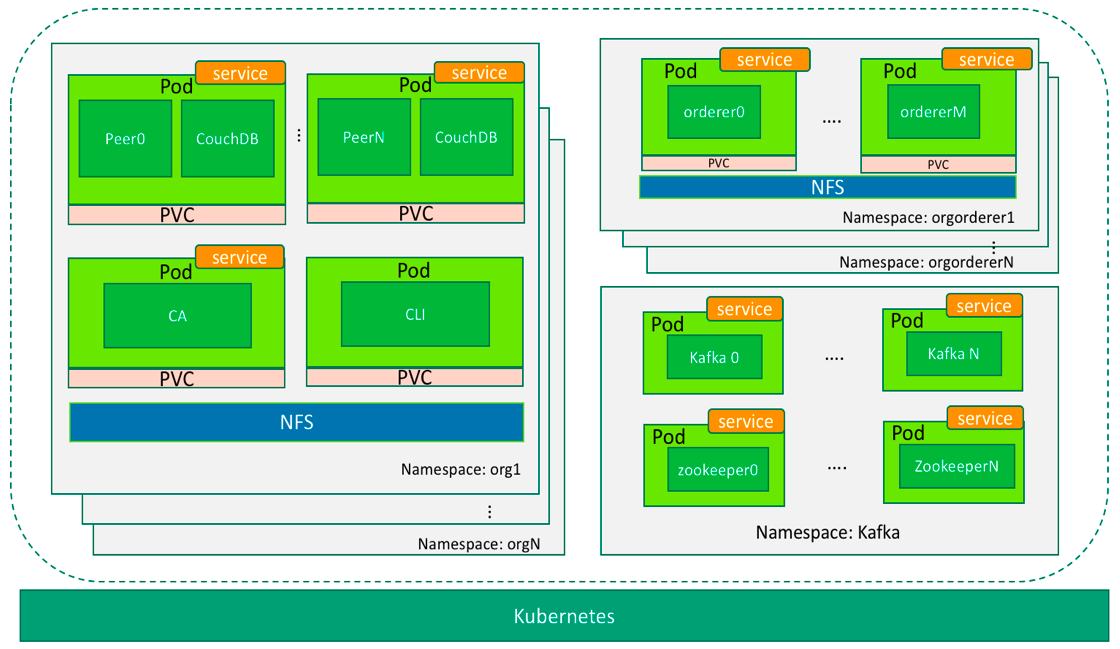
While deploying Fabric on Kubernetes, we need to create appropriate configuration files for namespaces and pods which Fabric components are mapped to. Considering there could be many nodes in a Fabric cluster, it is complicated and error-prone to manually create these files. Fortunately, we can automate this process by using some scripts. Five templates serve as the cookie cutter to generate configuration files. They can be found in the templates directory of the downloaded sample code. The function of templates are as follows:
a) fabric_1_0_tmeplate_namespace.yaml
Define the namespace of the Fabric cluster in Kubernetes, which corresponds to the domain name of the organization.
b) fabric_1_0_template_cli.yaml
CLI pod deployment template for each namespace. The CLI pod provides a command line interface for managing all the peers within the organization, e.g. the creation of the channel and chaincode installation.
c) fabric_1_0_template_ca.yaml
The deployment template for the CA service of the Fabric. It is used for certificate management in the organization.
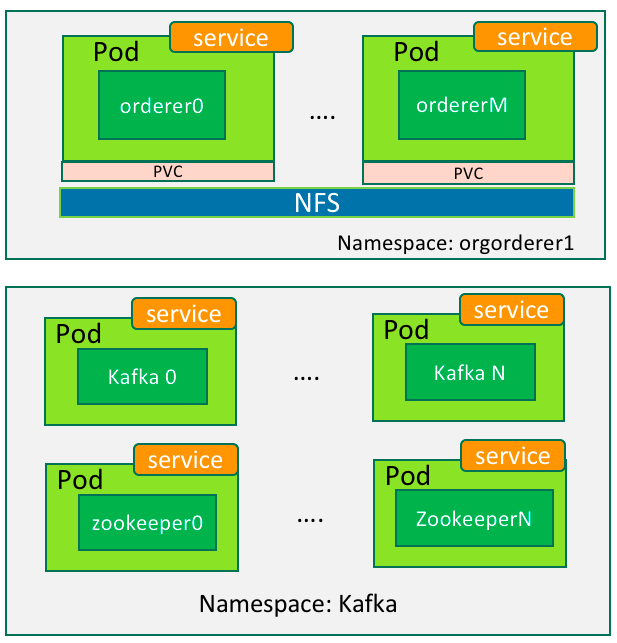
d) fabcric_1_0_template_orderer.yaml
Deployment template of orderer. It should be noted that cryptogen does not generate genesis block which the orderder replies on to start. Thus it’s necessary to prepare genesis block before booting up the orderer.
e) fabric_1_0_template_peer.yaml
Deployment template of peers. When instantiating a chaincode, peer needs to connect to the Docker endpoint to create the chaincode container. For this reason, the var/run/docker.sock of the host is mapped into the peer container.
Deploying Fabric onto Kubernetes
The following operations are performed on the CMD client in Figure 1. The shared directory of NFS is /opt/share. The directory on NFS should be owned by nobody:nogroup.
- Generating startup files
a) Mount the shared directory of NFS to /opt/share of local host.
b) Change to the Fabric-on-K8S/ directory. Use the following command to download Fabric cryptogen and other tools:
$ curl https://nexus.hyperledger.org/content/repositories/releases/org/hyperledger/fabric/hyperledger-fabric/linux-amd64-1.0.0/hyperledger-fabric-linux-amd64-1.0.0.tar.gz | tar xz
c) Change the NFS address of templates/fabric_1_0_template_pod_cli.yaml to your own NFS server, as shown in Figure 7:
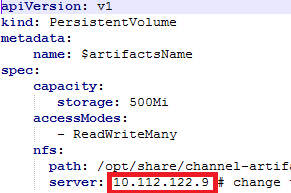
Figure 7
d) Edit templates/fabric_1_0_template_pod_namespace.yaml and modify the address of NFS as shown in Figure 8:
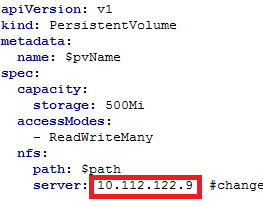
Figure 8
e) By default, cluster-config.yaml define two peer organizations and one orderer organization. Each peer organization has two peers. and orderer organization has only one orderer. We can add more organizations by modifying cluster-config.yaml.
f) Generate startup files by the following command:
$ sudo bash generateAll.sh
- Running startup script
Start the Fabric cluster with the following command (PyYAML-3.5 is required):
$ python3.5 transform/run.py
For each PeerOrganization orgN (N=1,2,3…), the workflow of run.py runs as follows:
- Create orgN namespace in Kubernetes;
- Create CA pod under orgN namespace;
- Create CLI pod under orgN namespace;
- Traverse the subdirectory of orgN/peers to find the corresponding yaml files and start all pods of the peers.
For each OrdererOrganization ordererorgN (N=1,2,3…), the workflow of run.py runs as follows:
- Create ordererorgN namespace in Kubernetes;
- Traverse the subdirectory of ordererorgN/orderers to find the corresponding yaml files and start all orderers.
- Checking cluster status
After starting the cluster, use the following command to check the status of all pods:
$ kubectl get pods --all-namespaces
When all pods are displayed as running, all components are working properly. Figure 9 is an example of the command output:

Figure 9
Testing the cluster
Assume we have deployed and started a Fabric cluster with the default cluster-config.yaml. Next, we will do some tests to verify the fabric cluster is working properly.
At first, we use the configtx tool to generate channel-related files to create and join a channel:
[1] Go to Fabric-on-K8S/setupCluster/ directory of the CMD client:
$ cd Fabric-on-K8S/setupCluster/
[2] Create the file channel.tx, where the channel ID is mychannel:
$ ../bin/configtxgen -profile TwoOrgsChannel -outputCreateChannelTx \

./channel-artifacts/channel.tx -channelID mychannel
[3] Create an upgrade file for the channel which updates the anchor of Org1 in mychannel:
$ ../bin/configtxgen -profile TwoOrgsChannel -outputAnchorPeersUpdate \
./channel-artifacts/Org1MSPanchors.tx -channelID mychannel -asOrg Org1MSP
[4] Create an upgrade file for the channel which updates the anchor of Org2 in mychannel:
$ ../bin/configtxgen -profile TwoOrgsChannel -outputAnchorPeersUpdate \
./channel-artifacts/Org2MSPanchors.tx -channelID mychannel -asOrg Org2MSP
[5] Since each Org’s CLI Pod needs to use the files created in the above steps, we can share these files with CLI Pod via NFS:
$ sudo cp -r ./channel-artifacts /opt/share/
After completing the above work, we enter the command prompt of CLI Pod of org1. From there we run commands as follows:
A) List all pods under org1 namespace:
$ kubectl get pods --namespace org1
As shown in Figure 10, we found out the CLI Pod of org1 is cli-2586364563-vclmr.

Figure 10
B) Enter the cli container’s command prompt:
$ kubectl exec -it cli-2586364563-vclmr bash --namespace=org1
C) Create a channel named mychannel:
$ peer channel create -o orderer0.orgorderer1: 7050 \
 -c mychannel -f ./channel-artifacts/channel.tx
D) Copy mychannel.block to channel-artifacts/ directory:
$ cp mychannel.block ./channel-artifacts
E) The peer joins mychannel:
$ peer channel join -b ./channel-artifacts/mychannel.block
F) Update the anchor peer. Each organization only needs to execute this command once:
$ peer channel update -o orderer0.orgorderer1: 7050 \

-c mychannel -f ./channel-artifacts/Org1MSPanchors.tx
G) Download the chaincode_example02/ directory of the Fabric project from Github. Place it in the /opt/share/channel-artifacts directory of the CMD client.
H) Install the chaincode named mycc:
$ peer chaincode install -n mycc -v 1.0 –p \
github.com/hyperledger/fabric/peer/channel-artifacts/chaincode_example02
I) Instantiate the chaincode mycc:
$ peer chaincode instantiate -o orderer0.orgorderer1: 7050 \
-C "mychannel -n mycc -v 1.0 -c \
'{" Args ": [" init "," a "," 100 "," b "," 200"]}' \
-P "OR ('Org1MSP.member', 'Org2MSP.member')"
After mycc is instantiated, we can switch to other organization’s CLI Pod by adding the same channel and other steps to verify whether the ledger has synchronized.
Externally invoking Fabric
Now that the Fabric cluster is up and running. However, it is only accessible from the Kubernetes’ network. To expose its service to external network, we should configure Kubernetes to accept external requests. To do that, the service type is defined as NodePort. The port mapping rules are described as follows ( N=1,2,3…. , and M = 0,1,2,3…):
1. The port range of orgN is 30000 + (N-1) * 100 ~ 30000 + (N) * 100-1 . Each organization can be assigned up to 100 port numbers. For example, org1’s port range is 30000 to 30099 .
2. The mapping of CA’s port 7054 is as follows:
ca.orgN: 7054 -> worker: 30000+ (N-1) * 100
3. Because each peer needs to expose both port 7051 and 7052, the port mapping of peerM in orgN is as follows:
peerM.orgN: 7051 -> worker: 30000+ (N-1) * 100 + 2 * M + 1
peerM.orgN: 7052 -> worker: 30000+ (N-1) * 100 + 2 * M + 2
For example: if a worker node of Kubernetes has an IP address of 192.168.0.7. We can access peer0.org1 through the 192.168.0.7:30001 (the peer’s port 7051).
4. The port of the ordererN:
ordererN: 7050 -> worker: 33700 + N
Note: NodePort is a way to expose service in Kubernetes. However, it occupies the same ports in the whole Kubernetes cluster. This may not work well in some situations. Refer to Kubernetes’ document for other approaches.
Deleting Fabric cluster
When we want to delete the Fabric cluster, run the transform/delete.py script to clean up the environment. The script will traverse the crypto-config directory and find out all the yaml files. It then removes the resources one by one by command “kuberclt delete-f xxx.yaml”.
Conclusion
In this 2-part blog posts, we walked through the mechanism and process of deploying Fabric on Kubernetes. While there could be improvement over our approach, we hope it shows a way to leverage Kubernetes for blockchain applications. Our approach has been used in a tool called “Blockchain on vSphere”. It is an automation tool that allow you to deploy Fabric on Kubernetes (and vSphere) with minimum configuration. You are welcome to try it out and give us feedback.
About the Authors:
Henry Zhang: Chief Architect of VMware China R&D, the creator of open source Project Harbor (https://github.com/vmware/harbor) – an enterprise class container registry server. Henry is a co-author of the book “Blockchain Technical Guide”. He is also a contributor of Hyperledger Cello project.
Luke Chen: MTS intern at VMware China R&D. He is a master student at Guangzhou University. He is a contributor of Hyperledger Cello project.