Overview
Fabric is one of the Hyperledger projects hosted by the Linux Foundation. It provides a framework to develop blockchain applications. Since the release of Fabric 1.0 in this July, people are eager to build applications using Fabric to solve their business problems. However, many encounter difficulties in deploying and managing the Fabric system due to the complexity of Fabric in configuration.
To simplify the operation of Fabric, we need some tools to help us better manage the distributed system of Fabric. Kubernetes seems ideal for this purpose for several reasons. (It is interesting to note that Kubernetes is a flagship project under CNCF, which is also a Linux Foundation project.)
First, Fabric’s bits are built into container images. Its chaincode (smart contract) also leverages container to run in a sandbox. The Fabric system consists of components running in multiple containers. On the other hand, Kubernetes is becoming the dominant platform to automate the deployment, scaling, and other management of containerized applications. There is a natural fit of the two.
Second, Fabric components can achieve high availability by deploying on Kubernetes. Kubernetes has a feature called replicator, which monitors running pods and brings up crashed ones automatically.
Third, Kubernetes supports multi-tenancy. We can run multiple isolated Fabric instances on the same Kubernetes platform. This facilitates the development and testing of blockchain applications.
In the following sections, we introduce a way to deploy Fabric on Kubernetes. We assume readers have basic knowledge of Fabric, Docker container and Kubernetes.
Network Topology
Our network topology is shown in Figure 1. The physical network is represented by blue lines. Kubernetes has one or more master and worker nodes. Besides that, we have a CMD machine as a client to issue the deployment commands. An NFS server is used as a shared file system for configuration files and other data. All these nodes are connected by a physical network (e.g. 192.168.0.1/24).
Kubernetes’ network model enables all pods to connect to each other directly regardless which node they are on. By using Kubernetes’ CNI addons, such as Flannel, it’s easy to create an overlay network for this purpose. As indicated by the red lines in Figure 1 (some details of flannel components are omitted), Kubernetes connects all pods to the Flannel network, allowing containers of those pods to communicate with each other properly.
The IP address range of the Flannel network, as well as the IP address of the kube_dns can be specified in the add-on configuration file. We need to make sure the IP address of kube_dns must be in the specified address range. In Figure 1, for example, the Flannel network is 10.0.0.1/16, and the kube_dns address is 10.0.0.10.

Figure 1
Mapping Fabric Components to Kubernetes Pods
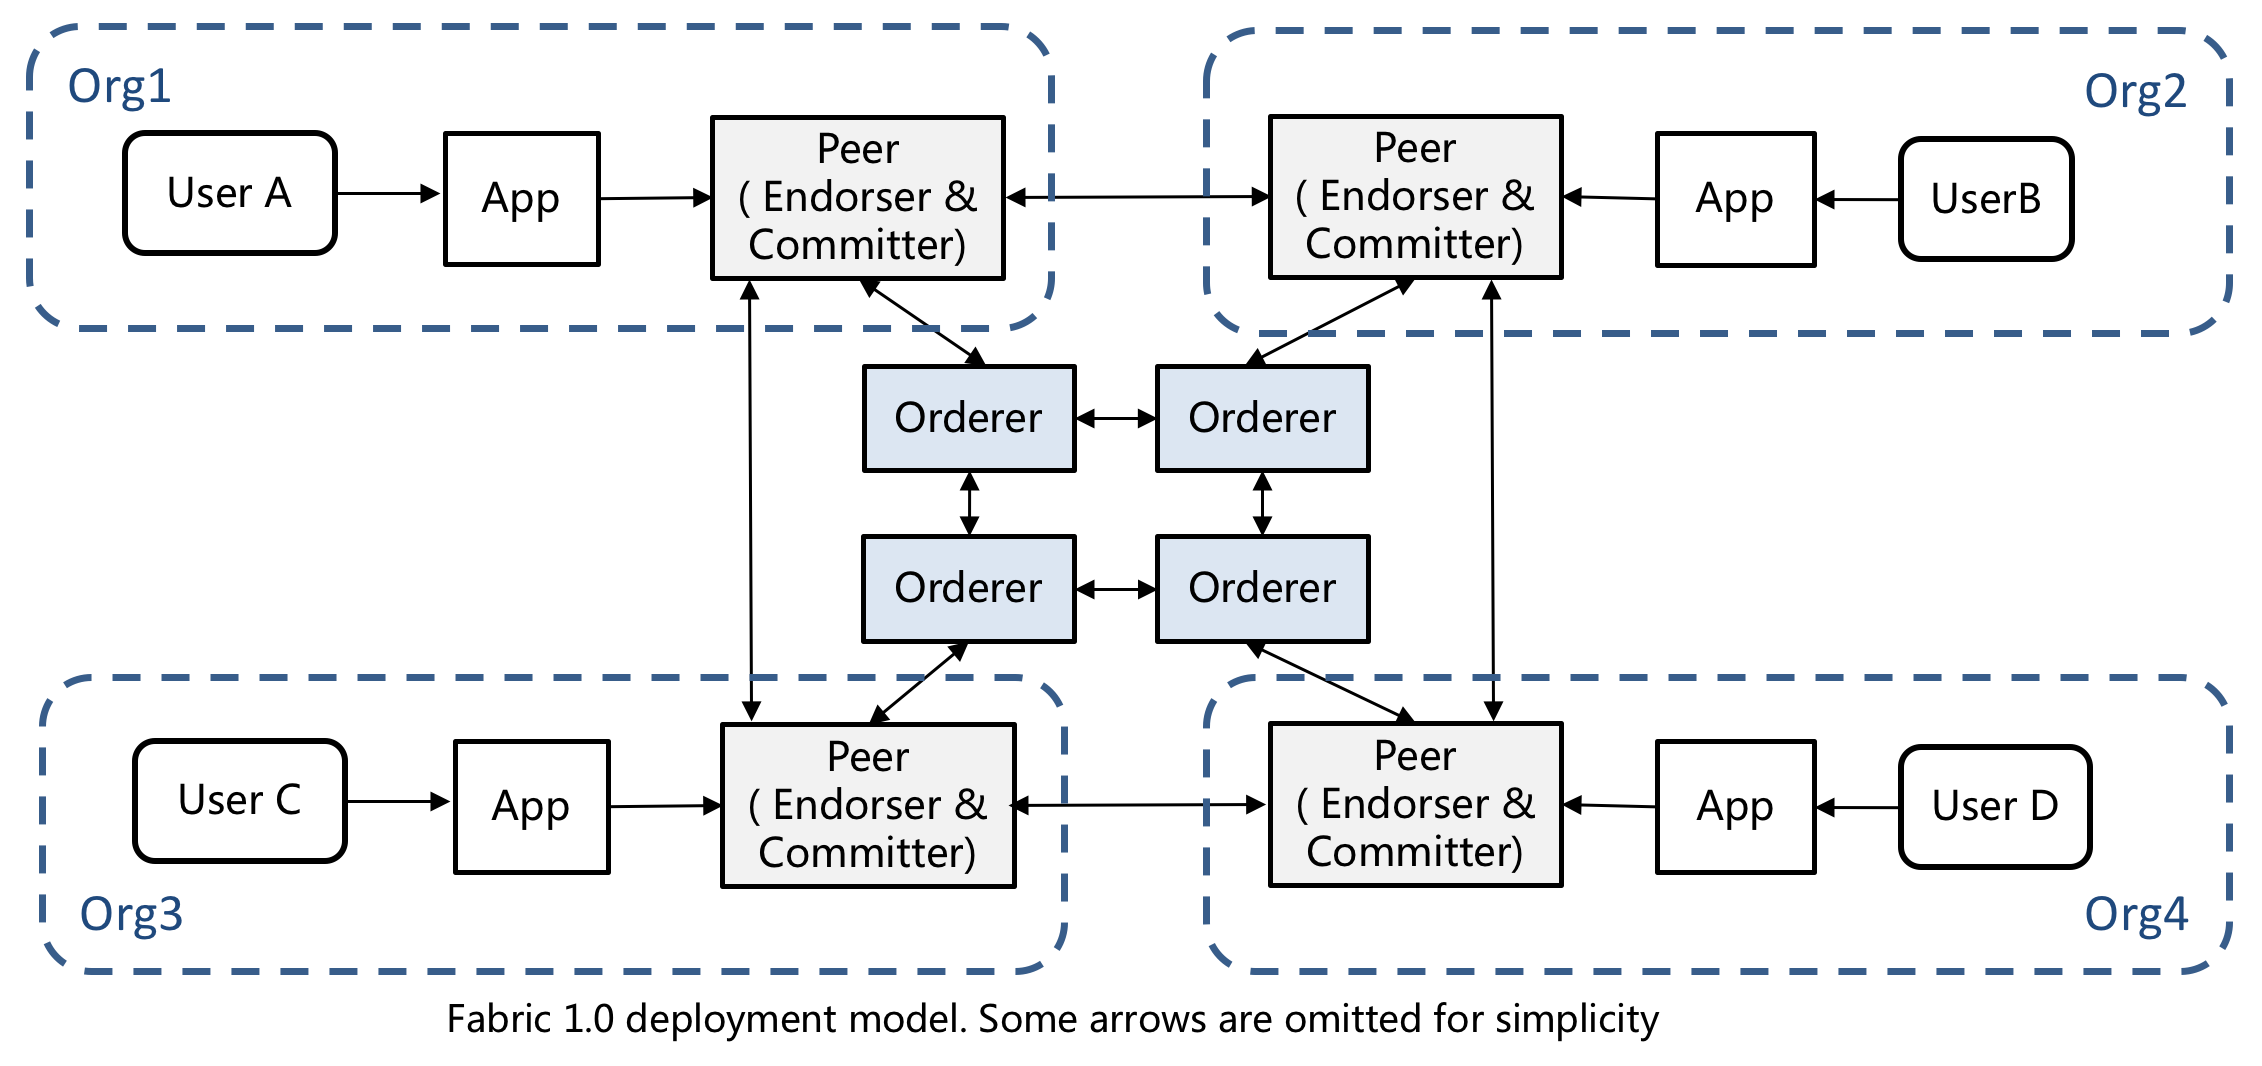
Figure 2
Fabric is a distributed system which contains multiple nodes. The nodes could belong to different entities. As shown in Figure 2, each organization has its own set of nodes (For simplicity, not all nodes are shown). There is also a public consensus service formed by Orderers. To deploy Fabric onto Kubernetes, we need to convert all components into pods for deployment and use namespace to segregate organizations.
In Kubernetes, namespace is an important concept. It is used to divide cluster resources between multiple users. In the case of Fabric, organizations can be mapped into namespaces so that they have their dedicated resource. After this mapping, peers of each organization can be distinguished by domain name. Furthermore, we could isolate different organizations by setting network policy (not covered in this blog).
As shown in Figure 2, suppose there are N peer organizations and M orderer organizations in the Fabric network. Here’s how we divide them on Kubernetes:
A) If Fabric, we assign the N-th peer organization with a name orgN. Its corresponding namespace in Kubernetes is also called orgN. All components of Fabric orgN will be placed into namespace orgN in Kubernetes. There are multiple pods under each organization’s namespace. A pod is a deployment unit in Kubernetes, it consists of one or more containers. We can bundle Fabric containers of each organization into several pods. These pod types are as follows:
- Peer Pod: including Fabric peer, couchDB (optional), representing the organization’s peer node. Each organization could have one or more peer pods.
- CA Server Pod: Fabric CA Server node of the organization. Usually one pod is needed in an organization.
- CLI Pod: (optional) Provides an environment for command-line tools to manipulate the nodes of the organization. Fabric’s peer environment variables are configured in this pod.
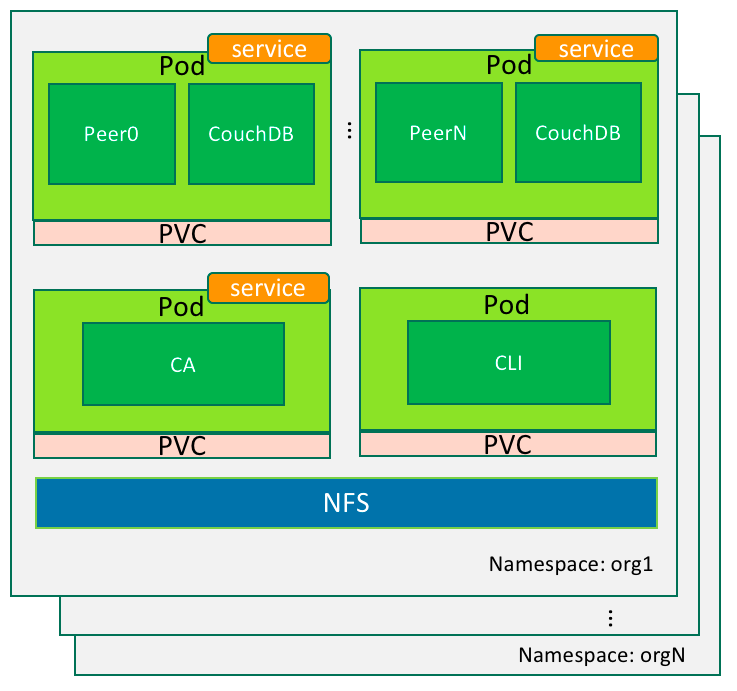
Figure 3
B) There could be one or more orderers in Fabric. We set the name of the M-th orderer organization to orgordererM. Its corresponding namespace on Kubernetes is orgordererM. It has one or more pods to run the orderer node(s).
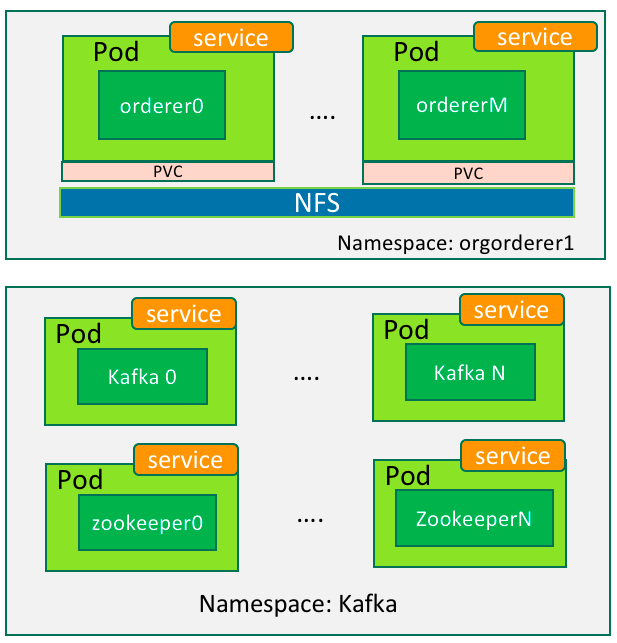
Figure 4
C) If Kafka is used for consensus process, we can put Kafka into a separate namespace. It is only used to run and manage Zookeeper and Kafka containers.
Putting it altogether, the overall deployment would look like below:
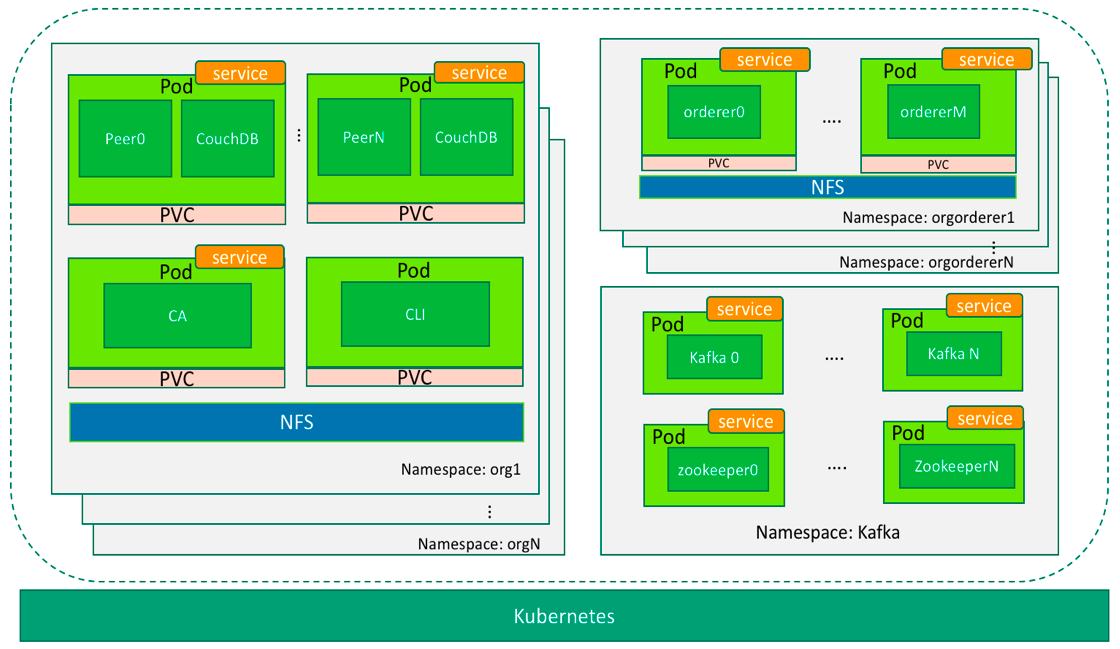
Figure 5
Shared storage
Before we deploy Fabric, we need to prepare configuration files of its components, such as peers and orderers. This is a very complicated process and tends to be error prone. Fortunately, we created a tool to automate the generation of these configuration files. The generated files are stored in a shared file system like NFS.
When we later launch the pods of Fabric, we mount different subsets of configuration files into pods so that they have configuration specific to the organization they belong to.
In Kubernetes, we can mount files or directories into a pod by using Persistent Volume (PV) and Persistent Volume Claim (PVC). We create PVs and PVCs for each organization in Fabric for resource isolation. Each organization should only see its own directory in NFS server.
After the creation of PV, we define PVC so that Fabric nodes can consume PV to access the corresponding directories and files.
Take peer organization org1 as an example. At first, we create a namespace org1 and its PV. The PV is mapped to the directory /opt/share/crypto-config/peerOrganizations/org1 on NFS. Secondly, we create a PVC to consume the PV. All pods under the namespace org1 use the same PVC. However, we only map necessary files into each pod by specifying the mounting path in the pod configuration file.
Figure 6 shows the relationship between pods and their shared directory of NFS. Variable $PVC represents the PVC mount point, which is /opt/share/crypto-config/peerOrganizations/org1 in this example.
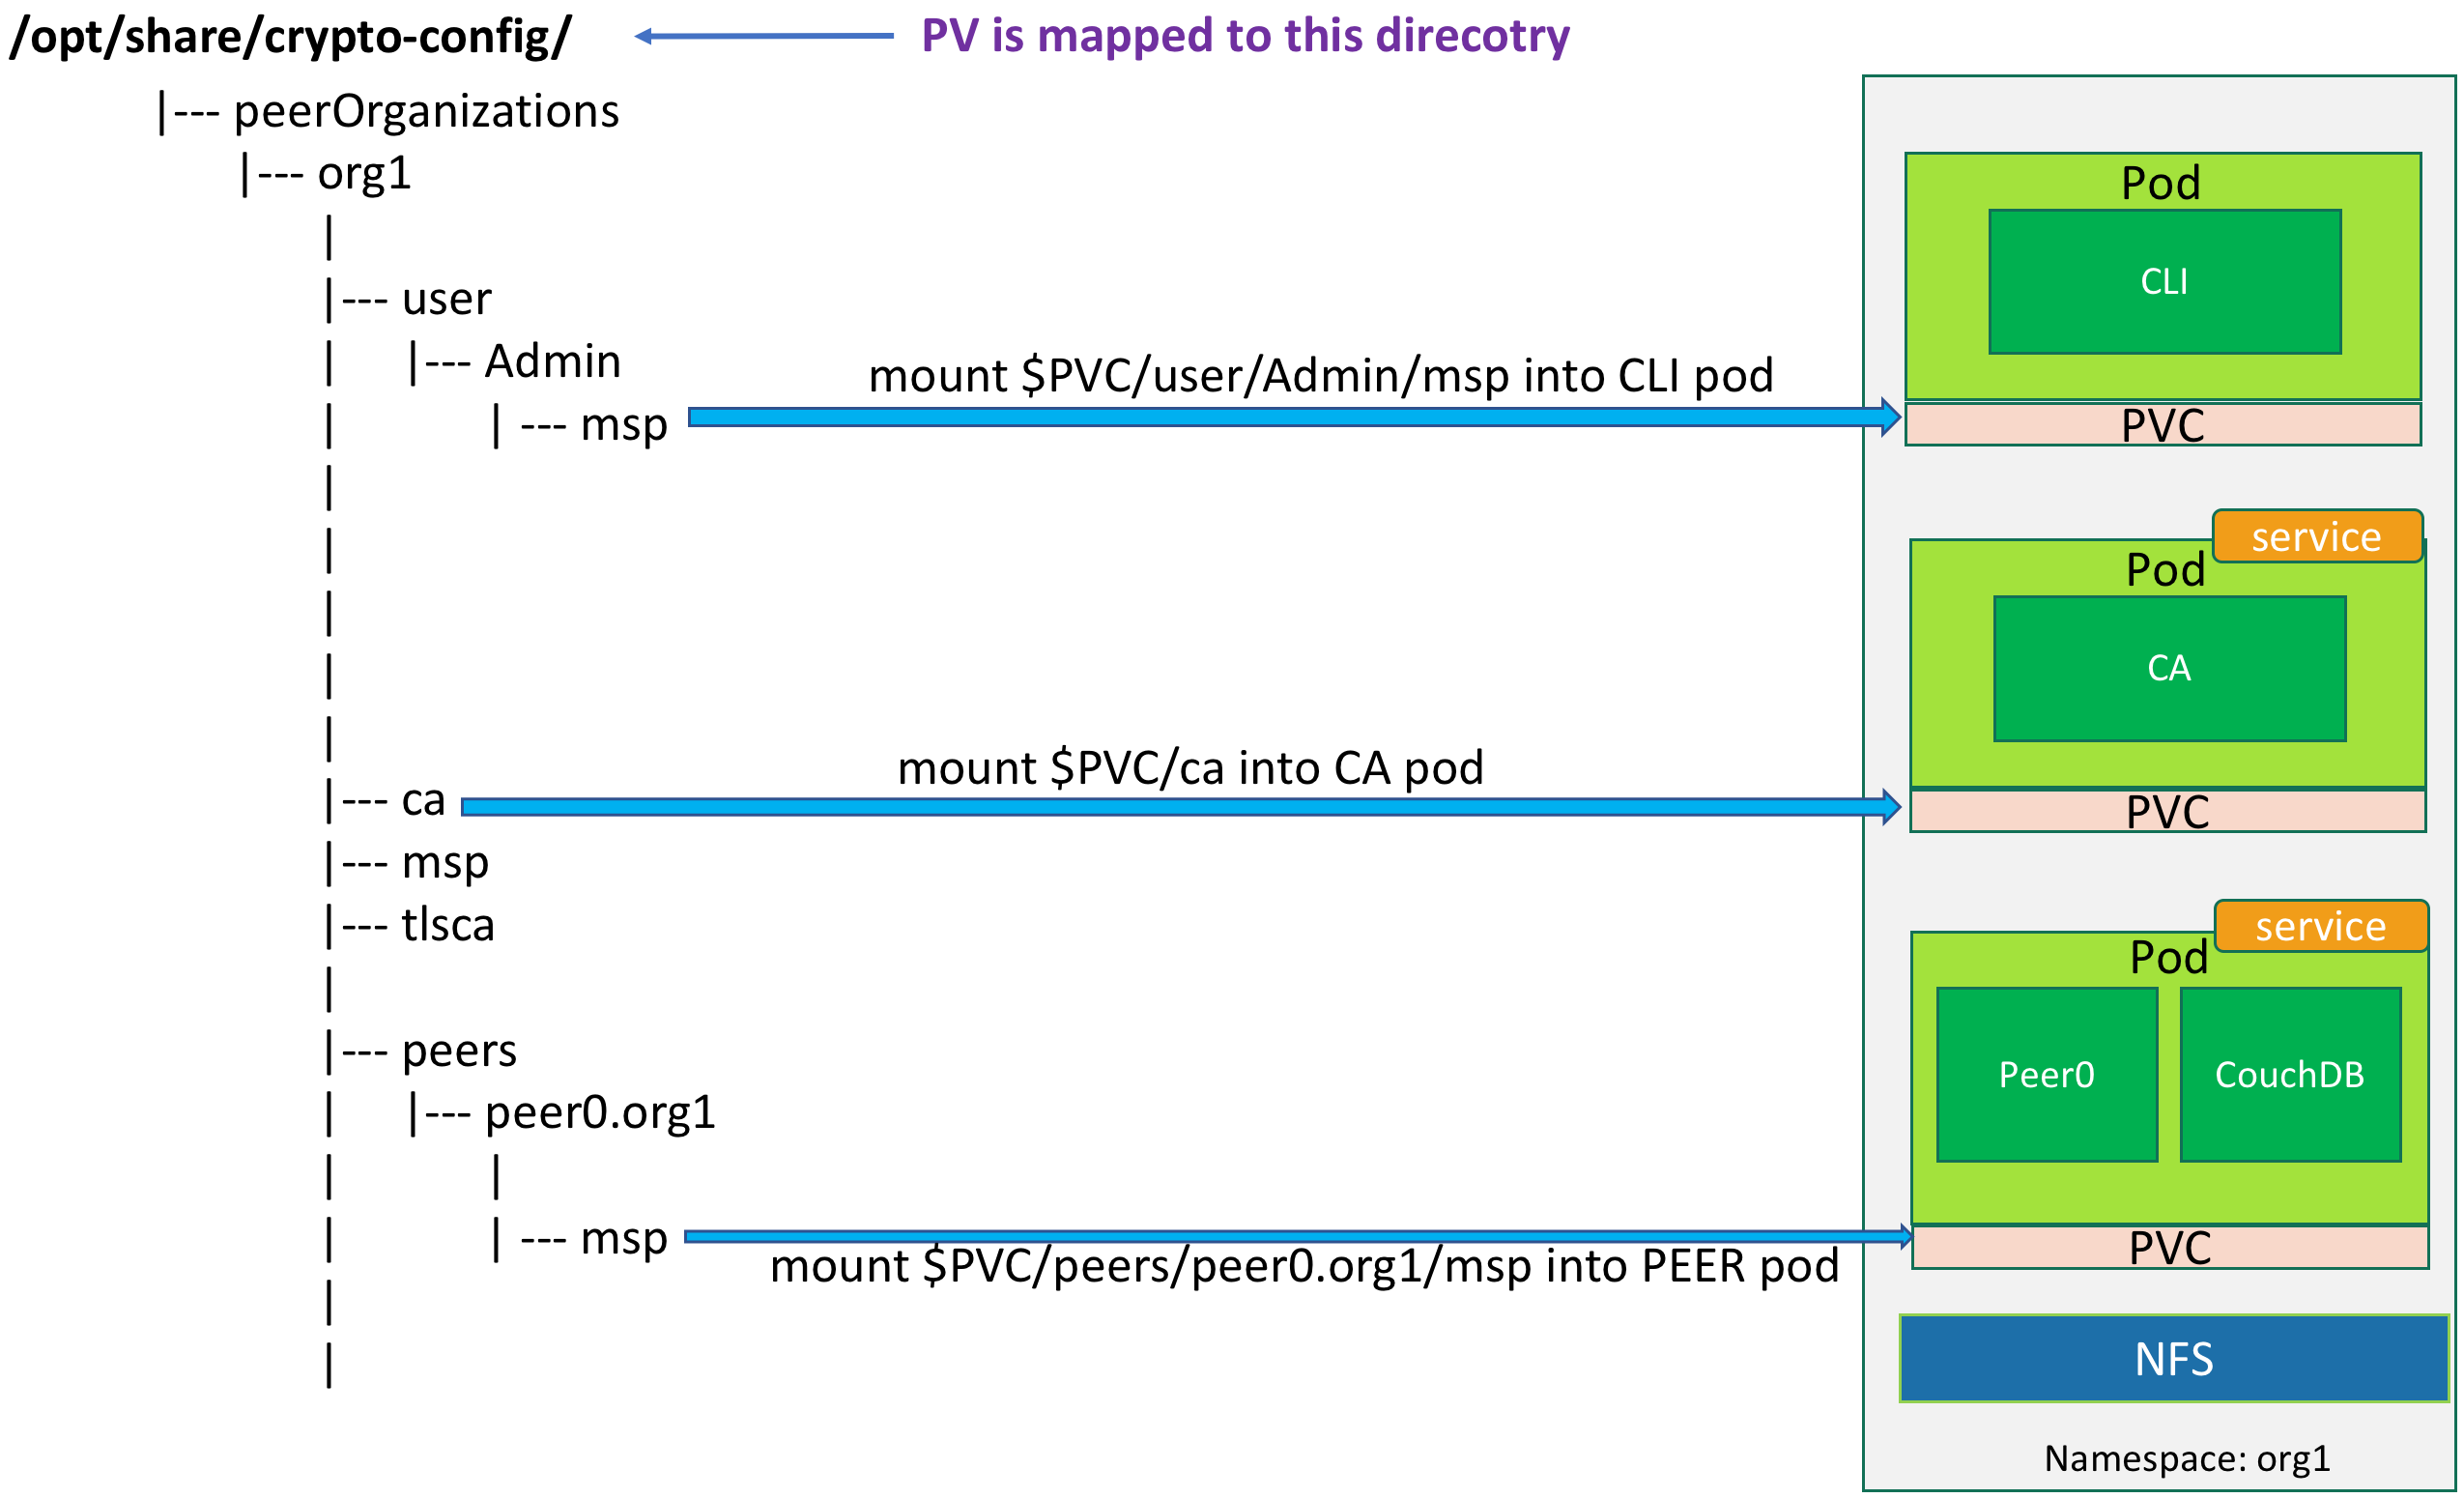
Figure 6
Communication between Fabric components
When all Fabric’s components are placed into Kubernetes’ pods, we need to consider the network connectivity between these pods. Each pod in Kubernetes has an internal IP address, but it is hard to use IP and port to communicate between pods because the IP address is ephemeral to the pod. When the pod gets restarted, its IP address gets changed too. Therefore, it is necessary to create services in Kubernetes for pods so that they can talk to each other through service name. The naming of a service should follow the principles to show the pod information that it binds to:
1) The namespace of the service and the pod should be consistent.
2) The name of the service should be consistent with the id of the container within the pod.
Fabric’s peer0 of organization org1, for example, is mapped to a pod named peer0 under namespace org1. The service binding to it should be named peer0.org1, where peer0 is the name of the service and org1 is the namespace of the service. Other pods can connect to the peer0 of org1 by service name peer0.org1, which appears as peer0’s hostname.
Work around the chaincode sandbox
When a peer in Fabric instantiates a chaincode, it creates a Docker container in which the chaincode runs. The Docker API endpoint it invokes to create the container is unix:///var/run/docker.sock . This mechanism works well as long as the peer container and the chaincode container are managed by the same Docker engine. However, in Kubernetes, the chaincode container is created by the peer without notifying Kubernetes. Hence the chaincode and peer containers cannot connect to each other which results in failure when instantiating the chaincode.
To work around this problem, we need to add the Kube_dns IP address in each worker node’s Docker engine. Add in the below option in Docker engine’s configuration file. In the below example, 10.0.0.10 is the IP address of kube_dns pod. Replace it with the right value in your environment.
"--dns=10.0.0.10 --dns=192.168.0.1 --dns-search \
default.svc.cluster.local --dns-search \
svc.cluster.local --dns-opt ndots:2 --dns-opt \
timeout:2 --dns-opt attempts:2 "
Up to now, we have illustrated the key points in deploying Fabric onto Kubernetes. In the next post, we will describe detailed steps of the deployment. For people who cannot wait, please download our Fling “Blockchain on vSphere” to get a feel of how it works. It is an automation tool that allow you to deploy Fabric on Kubernetes with minimum configuration. If you do not use vSphere to run Kubernetes, you can choose whatever underlying infrastructure for your Kubernetes instance. Just skip the part to deploy Kubernetes on vSphere.
Continue with Part 2:
Deploy Hyperledger Fabric on Kubernetes Part 2
About the Authors:
Henry Zhang: Chief Architect of VMware China R&D, the creator of open source Project Harbor (https://github.com/vmware/harbor) – an enterprise class container registry server. Henry is a co-author of the book “Blockchain Technical Guide”. He is also a contributor of Hyperledger Cello project.
Luke Chen: MTS intern at VMware China R&D. He is a master student at Guangzhou University. He is a contributor of Hyperledger Cello project.
we need the second part please
working on it. Stay tuned…
can’t wait for the second part, thank you guys very well explained and detailed. great job !!!
thank you for this tut. when approximately will be the second part ?