Henry Zhang, Jiahao Chen, Hui Hu, Wenkai Yin
This blog post is to share the personal technical experience of the authors. It does not represent in any way the opinions of the authors’ employers.
* We assume readers are familiar with Helm, Docker, Kubernetes, and have knowledge of the Fabric’s architecture.
This post introduces an approach to deploy Fabric via Helm Chart. The Chart allows a user to flexibly configure the consensus algorithm (solo/Kafka) and the number of organizations and nodes of the Fabric network.
Our previous blogs describe how to deploy Fabric on Kubernetes (K8s), which were widely read and followed by the community members. Many readers were inspired by our posts e and were able to use the K8s to manage their Fabric cluster. If you are new to this domain, you can review our previous posts and understand the steps that are used in deploying Fabric on Kubernetes.
Helm Chart is used as a preferred way by more and more developers to deploy their applications on Kubernetes. It is growing as to be a de facto standard. The advantage of Helm is its highly automated and repeatable deployment. A single “Helm” command can perform a series of actions, while it takes a number of “kubectl” commands to achieve the same purpose.
Introduction of Helm
Helm is a package manager for Kubernetes. It simplifies the deployment and management of Kubernetes applications. Helm has three important concepts:
- Chart: defines a package format that can be deployed on Kubernetes. A Chart contains a set of files that describe Kubernetes related resources.
- Config: used to store the configuration information of the software, used together with Chart to create a Release.
- Release: a running instance of a Chart.
Helm consists of two important functional components: the Helm Client and the Tiller Server.
- Helm Client is a command-line tool for end users. It is used primarily for developing local charts, managing Chart repositories, and interacting with Tiller Server.
- Tiller Server is installed in the Kubernetes cluster. It accepts requests from the Helm Client and interacts with the Kubernetes API Server, including responding to Helm Client requests, combining Chart and Config to create Releases, installing Charts into Kubernetes and keeping track of status.
Deploying Fabric by Helm Chart
- Helm installation
Please refer to the official document: https://docs.helm.sh/using_helm/#installing-helm
- Preparing the NFS server
In our deployment model, an NFS server is a place for sharing the configuration information among the Fabric nodes, so an available NFS server is required. For the details of how NFS server works in deployment, please refer to this post: How to Deploy Hyperledger Fabric on Kubernetes (1)
- Generating Certificates
In Fabric’ github repo (https://github.com/hyperledger/fabric), you could find a tool called “cryptogen”, which allows user to generate certificate files. The certificates are used by entities of Fabric network such as users and nodes.
In general, a user can define the organization structure in a YAML file, such as the number of organizations, the name and domain of organizations. The “cryptogen” tool can load the configuration file and generate corresponding certificate files.
A sample configuration file called “cluster-config.yaml” is as follows:
OrdererOrgs:

- Name: Orderer

Domain: example.com

Template:

Count: 1

PeerOrgs:

- Name: Org1

Domain: org1.example.com

Template:

Count: 1

- Name: Org2

Domain: org2.example.com

Template:

Count: 1
The keywords of OrdererOrgs and PeerOrgs are used to distinguish the types of organizations. The structure of the two organizations is as follows:
- OrdererOrgs defines the information of the orderer organization. The above sample defines an organization named “Orderer” whose domain name is “example.com”, and it specifies the value of “Template.Count” as 1, thus there is only one orderer certificate will be generated, which is identified by “orderer0”.
- PeerOrgs defines the information of the peer organization. The above sample defines two organizations: “Org1” and “Org2” . The corresponding domain names are “org1.example.com” and “org2.example.com”. Like the orderer, a Peer is provisioned to each organization. The first peer in “Org1” and “Org2” are both identified as “peer0”. They can be easily distinguished by the domain name.
For more configuration information about cryptogen, please refer to the description in the source code.
- Downloading the Chart
Download the chart via git clone:
https://github.com/LordGoodman/fabric-chart
or
https://github.com/hainingzhang/articles
After downloading, go to the fabric -chart/ directory.
- Editing “values.yaml” of the chart
- Select the consensus algorithm: “consensusType” is used to configure consensus algorithm: solo or Kafka. Helm will render the deployment templates accordingly.
- Modify the definition of organization: since the “crypto-config” directory generated in step 3 contains an hierarchy of subdirectories based on the file “cluster-config.yaml”, the same information needs to be included into “values.yaml” to ensure that Fabric nodes could find their certificate files correctly. The easiest way is to copy the content of the above “cluster-config.yaml” to “values.yaml”.
- Configure the NFS server, add NFS server information to let Fabric nodes load their configuration files in the Kubernetes environment.
A sample “values.yaml” is as follows:
clusterName: mycluster

consensusType: solo

nfs:

ip: 10.192.10.10

basePath: /opt/share

ordererOrgs:

- name: orderer

domain: example.com

template:

count: 1

peerOrgs:

- name: org1

domain: org1.example.com

template:

count: 1

- name: org2

domain: org2.example.com

template:

count: 1
- Moving the certificates to NFS server
The certificate files generated in step 3 are stored in a directory called “crypto-config/”. To allow Fabric nodes to obtain the certificate information, the certificate files should be copied onto the NFS server so that the nodes can access the certificate files through PV (persistent volume).
For example, assuming that the directory exported by the NFS server is “/opt/share”, “crypto-config” should be placed in the following path:
“/opt/share/<clusterName>/resources/crypto-config”, where clusterName is used to distinguish different instances of Fabric cluster. In our sample values.yaml in step 5, the clusterName is mycluster.
- Deploying Chart to Kubernetes
After the above steps, use the following command to deploy the Fabric to the Kubernetes cluster:
$ helm install .
The architecture of Fabric on Kubernetes is as follows:
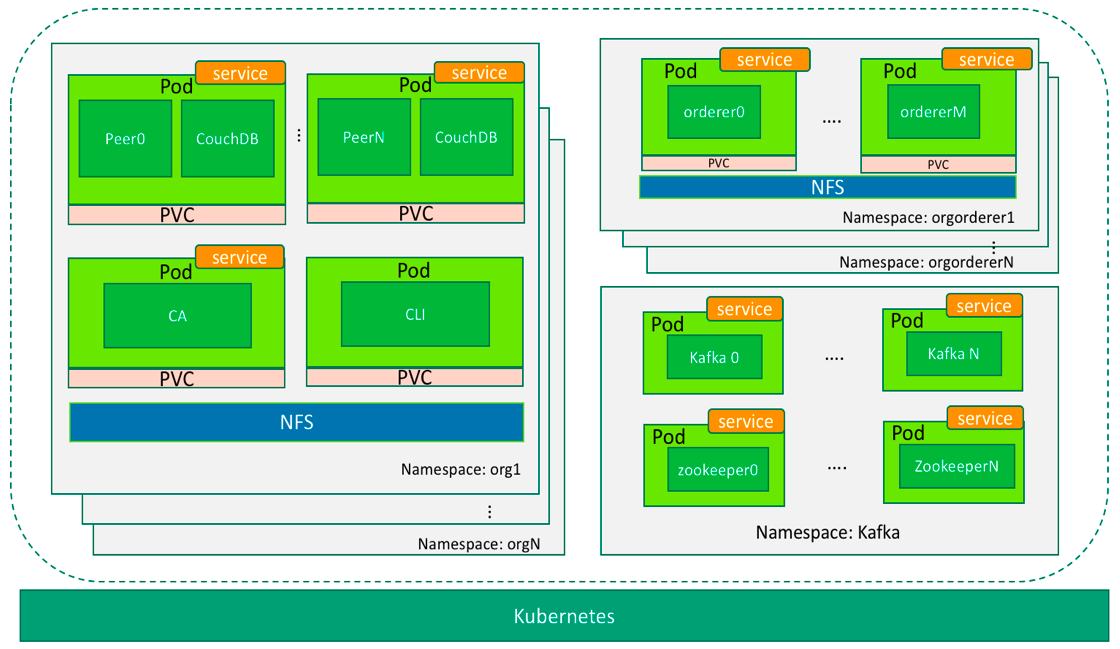
- Installation principles
Basically, the Fabric Chart contains a set of dynamitic deployment templates. Before the actual deployment of Fabric, Helm renders the Fabric Chart based on “value.yaml”. It then pushes the rendered deployment files to Tiller server, Tiller calls the Kubernetes APIs and finishes the deployment eventually.
We take the template file (fabric-chart/templates/peer.yaml) of the Peer node as an example to briefly explain this process:
1)
{{- range $peerOrg := $root.Values.peerOrgs}}
In the definition of the template, each Org corresponds to a namespace in Kubernetes. Each peer is mapped to a Pod under its org’s namespace, therefore the rendering will iterate through all the Orgs.
2)
{{- $namespace := printf "%s-%s" $orgName $clusterName }}

{{- $scope := dict "name" $namespace }}

{{- template "namespace" $scope }}
Render the namespace for an Org in each iteration. The namespace takes the format of “org.name-clustName”.
3)
{{- $name := printf "%s-shared" $namespace }}

{{- $scope := dict "name" $name "nfsServer" $root.Values.nfs.ip "nfsPath" $nfsPath "pvcNamespace" $namespace "pvcName" $sharedPVCName }}

{{- template "persistentVolume" $scope }}
The same as the iteration described above, render the Persistent Volume and Persistent Volume Claim for Pods within the same namespace.
4)
{{- range $index := until ($peerOrg.template.count | int) }}

{{- $name := printf "peer%d" $index }}

{{- $scope := dict "name" $name "namespace" $namespace "orgName" $orgName "orgDomainName" $orgDomainName "pvc" $sharedPVCName }}

{{- template "peer.deployment" $scope }}

{{- $name := printf "peer%d" $index }}

{{- $scope := dict "name" $name "namespace" $namespace }}

{{- template "peer.service" $scope }}
Finally, the deployment file of the Peer node will be rendered according to the Organization’s information. The deployment file is consisted of Kubernetes resources, such as deployment, service and ingress.
The templates also define other Fabric components like Orderer, CA and CLI. Readers can find them in fabric-chart/templates.
Related blogs:
Deploy Hyperledger Fabric on Kubernetes Part 1
Deploy Hyperledger Fabric on Kubernetes Part 2
Related Information:
A tool (including Blockchain Explorer) to automate the deployment Fabric on Kubernetes can be found at here.